Skip to content
Kong Summit 2022: Where API Innovation Runs Wild  —Learn More →
Kong Logo | Kong Docs Logo
search
  • We're Hiring!
  • Docs
    • Kong Gateway
    • Konnect Cloud
    • Kong Mesh
    • Plugin Hub
    • decK
    • Kubernetes Ingress Controller
    • Insomnia
    • Kuma

    • Kong Konnect Platform

    • Docs contribution guidelines
  • Plugin Hub
  • Support
  • Community
  • Kong Academy
Request Demo
  • Kong Gateway
  • Konnect Cloud
  • Kong Mesh
  • Plugin Hub
  • decK
  • Kubernetes Ingress Controller
  • Insomnia
  • Kuma

  • Kong Konnect Platform

  • Docs contribution guidelines
  • 2.8.x (latest)
  • 2.7.x
  • 2.6.x
  • Older Enterprise versions (0.31-2.5)
  • Older OSS versions (0.13-2.5)
  • Archive (pre-0.13)
    • Version Support Policy
    • Changelog
    • Kubernetes
    • Helm
    • OpenShift with Helm
    • Docker
    • Amazon Linux
    • CentOS
    • macOS
    • Debian
    • RHEL
    • Ubuntu
    • Migrating from OSS to EE
    • Upgrade Kong Gateway
    • Upgrade Kong Gateway OSS
      • Configuring a Service
      • Configuring a gRPC Service
      • Enabling Plugins
      • Adding Consumers
      • Prepare to Administer
      • Expose your Services
      • Protect your Services
      • Improve Performance
      • Secure Services
      • Set Up Intelligent Load Balancing
      • Manage Administrative Teams
      • Publish, Locate, and Consume Services
    • Running Kong as a Non-Root User
    • Resource Sizing Guidelines
      • Deploy Kong Gateway in Hybrid Mode
    • Kubernetes Deployment Options
    • Control Kong Gateway through systemd
    • Performance Testing Framework
    • DNS Considerations
    • Default Ports
      • Access Your License
      • Deploy Your License
      • Monitor License Usage
      • Start Kong Gateway Securely
      • Keyring and Data Encryption
      • Kong Security Update Process
      • Authentication Reference
        • OpenID Connect with Curity
        • OpenID Connect with Azure AD
        • OpenID Connect with Google
        • OpenID Connect with Okta
        • OpenID Connect with Auth0
        • OpenID Connect with Cognito
        • OpenID Connect Plugin Reference
      • Allowing Multiple Authentication Methods
        • Create a Super Admin
        • Configure Networking
        • Configure Kong Manager to Send Email
        • Reset Passwords and RBAC Tokens
        • Configure Workspaces
        • Basic Auth
        • LDAP
        • OIDC
        • Sessions
        • Add a Role
        • Add a User
        • Add an Admin
      • Mapping LDAP Service Directory Groups to Kong Roles
      • Enable the Dev Portal
      • Structure and File Types
      • Portal API
      • Working with Templates
      • Using the Editor
          • Basic Auth
          • Key Auth
          • OIDC
          • Sessions
          • Adding Custom Registration Fields
        • SMTP
        • Workspaces
        • Manage Developers
        • Developer Roles and Content Permissions
          • Authorization Provider Strategy
          • Enable Application Registration
          • Enable Key Authentication for Application Registration
          • External OAuth2 Support
          • Set up Okta and Kong for external OAuth
          • Set Up Azure AD and Kong for External Authentication
          • Manage Applications
        • Easy Theme Editing
        • Migrating Templates Between Workspaces
        • Markdown Rendering Module
        • Customizing Portal Emails
        • Adding and Using JavaScript Assets
        • Single Page App in Dev Portal
        • Alternate OpenAPI Renderer
      • Helpers CLI
    • Configure gRPC Plugins
    • GraphQL Quickstart
    • Logging Reference
    • Network and Firewall
      • Metrics
      • Reports
      • Vitals with InfluxDB
      • Vitals with Prometheus
      • Estimate Vitals Storage in PostgreSQL
    • Prometheus plugin
    • Zipkin plugin
      • DB-less Mode
      • Declarative Configuration
      • Supported Content Types
      • Information Routes
      • Health Routes
      • Tags
      • Service Object
      • Route Object
      • Consumer Object
      • Plugin Object
      • Certificate Object
      • CA Certificate Object
      • SNI Object
      • Upstream Object
      • Target Object
        • Licenses Reference
        • Licenses Examples
        • Workspaces Reference
        • Workspace Examples
        • RBAC Reference
        • RBAC Examples
        • API Reference
        • Examples
        • API Reference
        • Examples
        • Event Hooks Reference
        • Examples
      • Audit Logging
      • Keyring and Data Encryption
      • Securing the Admin API
    • DB-less and Declarative Configuration
    • Configuration Reference
    • CLI Reference
    • Load Balancing Reference
    • Proxy Reference
    • Rate Limiting Library
    • Health Checks and Circuit Breakers Reference
    • Clustering Reference
      • kong.client
      • kong.client.tls
      • kong.cluster
      • kong.ctx
      • kong.ip
      • kong.log
      • kong.nginx
      • kong.node
      • kong.request
      • kong.response
      • kong.router
      • kong.service
      • kong.service.request
      • kong.service.response
      • kong.table
      • Introduction
      • File structure
      • Implementing custom logic
      • Plugin configuration
      • Accessing the datastore
      • Storing custom entities
      • Caching custom entities
      • Extending the Admin API
      • Writing tests
      • (un)Installing your plugin
    • Plugins in Other Languages

github-edit-pageEdit this page

report-issueReport an issue

enterprise-switcher-iconSwitch to OSS

On this page
  • Authorization code flow with the OpenID Connect plugin and Okta
    • Sign-in flow
    • Access flow
    • Session flow
  • Example of configuring the OIDC plugin with Okta
    • Prerequisites
    • Configure Okta
    • Configure the OIDC plugin in Kong Gateway
    • Test Your Configuration
    • Access Restrictions
Kong Gateway
2.7.x
  • Home
  • Kong Gateway
  • Configure
  • Auth
You are browsing documentation for an outdated version. See the latest documentation here.

OpenID Connect with Okta

This guide covers an example OpenID Connect plugin configuration to authenticate browser clients using an Okta identity provider.

For information about configuring OIDC using Okta as an Identity provider in conjunction with the Application Registration plugin, see Set Up External Portal Application Authentication with Okta and OIDC.

Authorization code flow with the OpenID Connect plugin and Okta

Sign-in flow

OIDC signin flow

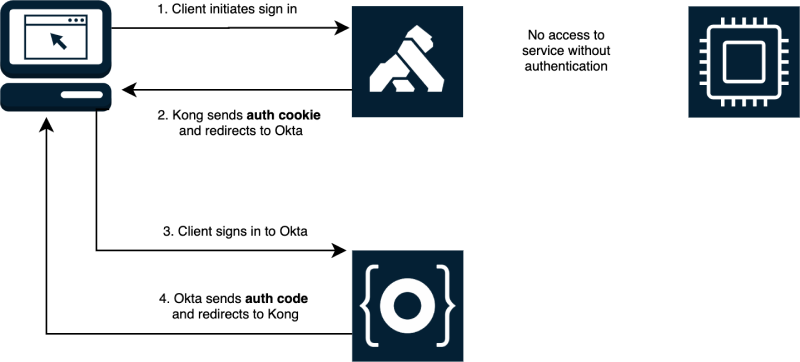
  1. If the client does not have a session cookie, it initiates sign in with Kong.
  2. Kong responds to the client with an authorization cookie and a location to redirect (with Okta as the header).
  3. the client redirects to Okta so the user can sign in.
  4. Okta responds with an authorization code and a location to redirect (with Kong as the header).

At this point, the client has successfully signed in and has an authorization code (from Okta) and an authorization cookie (from Kong).

Access flow

OIDC access flow

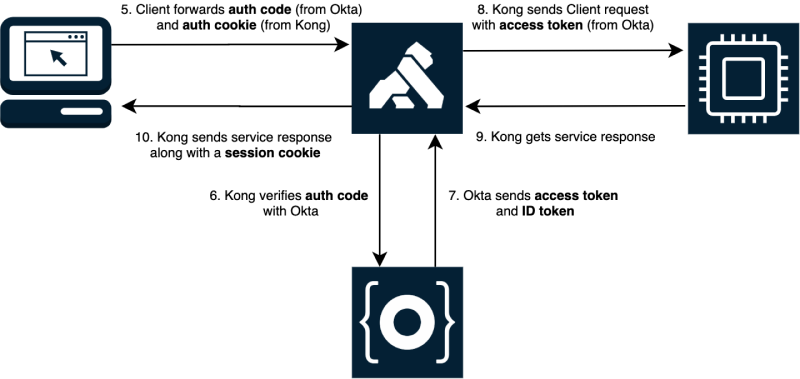
  1. The client redirects to Kong and automatically sends the authorization code (from Okta) and an authorization cookie (from Kong).
  2. Kong verifies the authorization code with Okta.
  3. Okta sends and access token and ID token to Kong.
  4. Kong proxies the client request with the access token from Okta.
  5. Kong receives a service response.
  6. Kong sends the service response to the client, along with a session cookie for future access.

At this point, the client now has a session with Kong that allows mediated access to the service.

Session flow

OIDC session flow

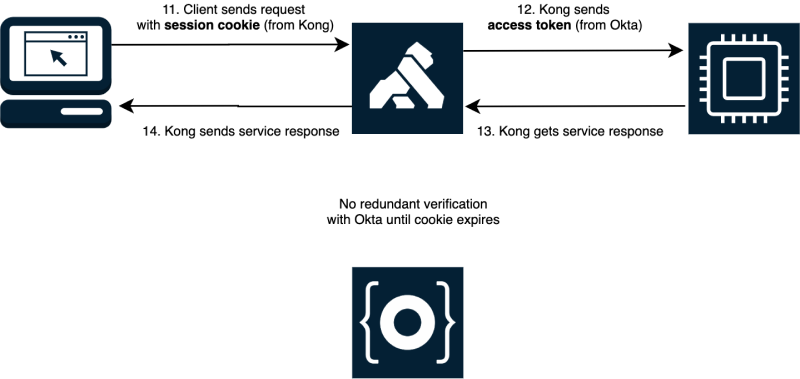
  1. The client sends requests with a session cookie.
  2. Kong matches the session cookie to the associate access token and proxies the request.
  3. Kong gets a response from the service.
  4. Kong sends the response to the client.

Kong’s session with the client ensures that the client does not need to make constant requests to Okta. The duration of the session can be configured.

Example of configuring the OIDC plugin with Okta

Prerequisites

The steps in the guide offer an example of configuring OIDC with Okta on a specific route. To follow this guide, you need the following:

  • A developer account with Okta.
  • A running version of Kong Gateway.
  • Access to the OpenID Connect plugin.
  • A service and route in Kong Gateway whose access you want to protect with Okta. For this guide, assume the route is in the default workspace.
  • If using Kong Gateway locally, you need Internet access.
  • Any network access control to your Kong node must allow traffic to and from Okta, the upstream service, and the client.

    For security reasons, make sure all requests are sent over HTTPS, and make the Kong proxy available with a fully-qualified domain name and properly configured certificate. Authorization tokens should also be stored securely.

Configure Okta

  1. Register the application you are using Kong to proxy.
  2. From the left menu, select Applications, then Create App Integration.
  3. Select the application type:

    1. Under Sign-in method, select OIDC - OpenID Connect.
    2. Under Application Type, select Web Application.
  4. Select Next. Configure the application:
    1. Create a unique name for your application.
    2. Under Grant Type, select Authorization Code.
    3. In both the Sign-in redirect URIs and Sign-out redirect URIs fields, enter a location handled by your Route in Kong Gateway.

      For this example, you can enter https://kong.com/api.

    4. In the Assigments section, for Controlled access, choose your preferred access level for this application. This preferred access level sets the permissions for Okta admins.
  5. Save your settings to generate connection details.

    Leave this page open. You’ll need the details here to configure the Kong OIDC plugin.

  6. Add an Authorization Server. From the left sidebar, go to Security > API > Authorization Server and create a server named Kong API Management with an audience and description. Click Save.

    On the page that appears, note the Issuer address. You need this address to configure the Kong OIDC Plugin.

Configure the OIDC plugin in Kong Gateway

Minimum configuration requirements

Configure the following parameters:

  • issuer: The issuer url from which OpenID Connect configuration can be discovered. Using Okta, specify the domain and server in the path:
    • https://YOUR_OKTA_DOMAIN/oauth2/YOUR_AUTH_SERVER/.well-known/openid-configuration
  • auth_method: A list of authentication methods to use with the plugin, such as passwords, introspection tokens, etc. The majority of cases use authorization_code, and Kong Gateway will accept all methods if no methods are specified.
  • client_id: The client_id of the OpenID Connect client registered in OpenID Connect Provider. Okta provides one to identify itself.
  • client_secret: The client_secret of the OpenID Connect client registered in OpenID Connect Provider. These credentials should never be publicly exposed.
  • redirect_uri: The redirect_uri of the client defined with client_id (also used as a redirection URI for the authorization code flow).
  • scopes: The scope of what OpenID Connect checks. openid by default; set to email and profile for this example.
Configure plugin with Kong Manager
Configure plugin with Admin API
  1. In Kong Manager, from the Workspaces tab, select the workspace where your route is configured.

  2. Click Routes in the left navigation.

  3. On the Routes page, select the route you have configured to protect with Okta and click View.

  4. Scroll to the bottom of the page and click Add Plugin.

  5. Select the OpenID Connect plugin.

  6. On the plugin’s configuration, in the Common tab, configure the following, at minimum:

    1. Issuer (Discovery Document URI):

       https://{YOUR_OKTA_DOMAIN}/oauth2/{YOUR_AUTH_SERVER}/.well-known/openid-configuration
      

      The issuer URL can be found in your Authorization Server settings.

    2. Client ID: {YOUR_CLIENT_ID}

      Replace YOUR_CLIENT_ID with the client ID shown in your Okta application’s General page.

    3. Client Secret: {YOUR_CLIENT_SECRET}

      Replace YOUR_CLIENT_SECRET with the client secret shown in your Okta application’s General page.

    4. Auth Methods: Authorization code flow

      This parameter lists of all the authentication methods that you want the plugin to accept. If you don’t select an auth method, all auth methods are allowed by default.

  7. Switch to the Authorization tab and fill out config.scopes required with openid, email, profile.

  8. Switch to the Advanced tab and fill out config.redirect_uri with https://kong.com/api.

    The redirect_uri should be the URI you specified earlier when configuring your app.

  9. Click Create to save and apply the plugin to the Route.

For a list of all available configuration parameters and what they do, see the OIDC plugin reference.

Configure the OpenID Connect plugin using the following sample values:

$ curl -i -X POST https://KONG_ADMIN_URL/routes/ROUTE_ID/plugins
  --data name="openid-connect"                                                                             \
  --data config.issuer="https://YOUR_OKTA_DOMAIN/oauth2/YOUR_AUTH_SERVER/.well-known/openid-configuration" \
  --data config.client_id="YOUR_CLIENT_ID"                                                                 \
  --data config.client_secret="YOUR_CLIENT_SECRET"                                                         \
  --data config.redirect_uri="https://kong.com/api"                                                        \
  --data config.scopes="openid"                                                                            \
  --data config.scopes="email"                                                                             \
  --data config.scopes="profile"

For a list of all available configuration parameters and what they do, see the OIDC plugin reference.

Visiting a URL matched by that route in a browser will now redirect to Okta’s authentication site and return you to the redirect URI after authenticating.

Test Your Configuration

Test the following conditions to ensure a successful integration of the OIDC plugin with Okta:

  • Unauthorized access to a route is blocked
  • Authorized access is allowed after login/providing first set of credentials
    • Ensure the identity is registered with the IdP
    • Steps for debugging
  • Authorized access is allowed on immediate subsequent attempts
    • Perhaps highlight where the cookie is stored
  • Previously authorized access is no longer allowed after cookie terminates
    • Set a very short TTL on the session to ensure the tester doesn’t need to wait long to get locked out

Access Restrictions

The example configuration allows users to authenticate and access the Route even though no Consumer was created for them. Any user with a valid account in the directory will have access to the Route. The OIDC plugin allows this as the simplest authentication option, but you may wish to restrict access further. There are several options for this:

  • Consumer Mapping
  • Pseudo-Consumer Mapping

Consumer Mapping

If you need to interact with other Kong plugins using consumer information, you can add configuration that maps account data received from the identity provider to a Kong consumer. For this example, the user’s Okta’s AD account GUID is mapped to a Consumer by setting it as the custom_id on their consumer:

$ curl -i -X POST http://admin.kong.example/consumers/ \
  --data username="Yoda" \
  --data custom_id="e5634b31-d67f-4661-a6fb-b6cb77849bcf"

$ curl -i -X PATCH http://admin.kong.example/plugins/OIDC_PLUGIN_ID \
  --data config.consumer_by="custom_id" \
  --data config.consumer_claim="sub"

Now, if a user logs into an Okta account with the GUID e5634b31-d67f-4661-a6fb-b6cb77849bcf, Kong will apply configuration associated with the Consumer Yoda to their requests.

This also requires that clients login using an account mapped to some Consumer, which might not be desirable (e.g., you apply OpenID Connect to a service, but only use plugins requiring a Consumer on some Routes). To deal with this, you can set the anonymous parameter in your OIDC plugin configuration to the ID of a generic Consumer, which will then be used for all authenticated users that cannot be mapped to some other Consumer. You can alternately set consumer_optional to true to allow similar logins without mapping an anonymous Consumer.

Pseudo-consumers

For plugins that typically require consumers, the OIDC plugin can provide a consumer ID based on the value of a claim without mapping to an actual Consumer. Setting credential_claim to a claim in your plugin configuration will extract the value of that claim and use it where Kong would normally use a consumer ID. Note that this may not work with all consumer-related functionality.

Similarly, setting authenticated_groups_claim will extract that claim’s value and use it as a group for the ACL plugin.

Thank you for your feedback.
Was this page useful?
  • Kong
    THE CLOUD CONNECTIVITY COMPANY

    Kong powers reliable digital connections across APIs, hybrid and multi-cloud environments.

    • Company
    • Customers
    • Events
    • Investors
    • Careers Hiring!
    • Partners
    • Press
    • Contact
  • Products
    • Kong Konnect
    • Kong Gateway
    • Kong Mesh
    • Get Started
    • Pricing
  • Resources
    • eBooks
    • Webinars
    • Briefs
    • Blog
    • API Gateway
    • Microservices
  • Open Source
    • Install Kong Gateway
    • Kong Community
    • Kubernetes Ingress
    • Kuma
    • Insomnia
  • Solutions
    • Decentralize
    • Secure & Govern
    • Create a Dev Platform
    • API Gateway
    • Kubernetes
    • Service Mesh
Star
  • Terms•Privacy
© Kong Inc. 2022