You are browsing unreleased documentation.
This plugin is not compatible with Konnect
Looking for the plugin's configuration parameters? You can find them in the OAuth 2.0 Authentication configuration reference doc.
Add an OAuth 2.0 authentication layer with one of the following grant flows:
- Authorization Code Grant
- Client Credentials
- Implicit Grant
- Resource Owner Password Credentials Grant
Important:
- Once applied, any user with a valid credential can access the service. To restrict usage to only some of the authenticated users, also add the ACL plugin (not covered here) and create allowed or denied groups of users.
- As per the OAuth2 specs, this plugin requires the underlying service to be served over HTTPS. To avoid any confusion, we recommend that you configure the route used to serve the underlying service to only accept HTTPS traffic (using its
protocolsproperty).
Usage
In order to use the plugin, you first need to create a consumer to associate one or more credentials to. The Consumer represents a developer using the upstream service.
This plugin requires a database in order to work effectively. It does not work in DB-less or hybrid mode.
Endpoints
By default the OAuth 2.0 plugin listens on the following endpoints when a client consumes the underlying Service via the proxy port:
| Endpoint | description |
|---|---|
/oauth2/authorize |
The endpoint to the Authorization Server that provisions authorization codes for the Authorization Code flow, or the access token when the Implicit Grant flow is enabled. Only POST is supported. |
/oauth2/token |
The endpoint to the Authorization Server that provision access tokens. This is also the only endpoint to use for the Client Credentials and Resource Owner Password Credentials Grant flows. Only POST is supported. |
/oauth2_tokens |
The endpoint to the Authorization Server that allows creating new tokens. Useful on migrations (see below). |
/oauth2_tokens/:token_id |
The endpoint to the Authorization Server that allows reading, modifying and deleting access tokens. |
The clients trying to authorize and request access tokens must use these endpoints. Remember that the endpoints above must be combined with the right URI path or headers that you normally use to match a configured Route through Kong.
Create a Consumer
You need to associate a credential to an existing Consumer object. To create a Consumer, you can execute the following request:
curl -X POST http://localhost:8001/consumers/ \
  --data "username=user123" \
  --data "custom_id=SOME_CUSTOM_ID"
| parameter | default | description |
|---|---|---|
usernamesemi-optional |
The username of the consumer. Either this field or custom_id must be specified. |
|
custom_idsemi-optional |
A custom identifier used to map the consumer to another database. Either this field or username must be specified. |
A Consumer can have many credentials.
Create an Application
Then you can finally provision new OAuth 2.0 credentials (also called “OAuth applications”) by making the following HTTP request:
curl -X POST http://localhost:8001/consumers/{consumer_id}/oauth2 \
  --data "name=Test%20Application" \
  --data "client_id=SOME-CLIENT-ID" \
  --data "client_secret=SOME-CLIENT-SECRET" \
  --data "redirect_uris=http://some-domain/endpoint/" \
  --data "hash_secret=true"
consumer_id: The Consumer entity to associate the credentials to
| form parameter | default | description |
|---|---|---|
name |
The name to associate to the credential. In OAuth 2.0 this would be the application name. | |
client_idoptional |
You can optionally set your own unique client_id. If missing, the plugin will generate one. |
|
client_secretoptional |
You can optionally set your own unique client_secret. If missing, the plugin will generate one. |
|
redirect_uris |
An array with one or more URLs in your app where users will be sent after authorization (RFC 6742 Section 3.1.2) | |
hash_secret |
false |
A boolean flag that indicates whether the client_secret field will be stored in hashed form. If enabled on existing plugin instances, client secrets are hashed on the fly upon first usage. |
Migrating Access Tokens
If you are migrating your existing OAuth 2.0 applications and access tokens over to Kong, then you can:
- Migrate consumers and applications by creating OAuth 2.0 applications as explained above.
- Migrate access tokens using the
/oauth2_tokensendpoints in the Kong’s Admin API. For example:
curl -X POST http://localhost:8001/oauth2_tokens \
  --data 'credential.id=KONG-APPLICATION-ID' \
  --data "token_type=bearer" \
  --data "access_token=SOME-TOKEN" \
  --data "refresh_token=SOME-TOKEN" \
  --data "expires_in=3600"
| form parameter | default | description |
|---|---|---|
credential |
Contains the ID of the OAuth 2.0 application created on Kong. | |
token_typeoptional |
bearer |
The token type. |
access_tokenoptional |
You can optionally set your own access token value, otherwise a random string will be generated. | |
refresh_tokenoptional |
You can optionally set your own unique refresh token value, otherwise no refresh token will be generated. | |
expires_in |
The expiration time (in seconds) of the access token. | |
scopeoptional |
The authorized scope associated with the token. | |
authenticated_useridoptional |
The custom ID of the user who authorized the application. |
Viewing and Invalidating Access Tokens
Active tokens can be listed and modified using the Admin API. A GET on the /oauth2_tokens endpoint returns the following:
curl -sX GET http://localhost:8001/oauth2_tokens/
Response:
{
  "total": 2,
  "data": [
    {
      "expires_in": 7200,
      "created_at": 1523386491000,
      "access_token": "FOEtUHwg0das9PhsasVmgMGbZn7nWSgK",
      "credential_id": "2c74324f-fa2d-434b-b6de-bd138652158f",
      "scope": "email",
      "id": "610740e5-700a-45f0-889a-5c7f0422c48d",
      "service_id": "898dfc5f-20f9-4315-a028-2ecb0193f834",
      "token_type": "bearer"
    },
    {
      "expires_in": 7200,
      "created_at": 1523386680000,
      "access_token": "58eat7UHEiPOmjNb16uQAxt4vu3fbu95",
      "credential_id": "2c74324f-fa2d-434b-b6de-bd138652158f",
      "scope": "email",
      "id": "edff2fc7-1634-4fb5-b714-de9435531e10",
      "service_id": "898dfc5f-20f9-4315-a028-2ecb0193f834",
      "token_type": "bearer"
    }
  ]
}
credential_id is the ID of the OAuth application at localhost:8001/consumers/{consumer_id}/oauth2 and service_id is the API or service that the token is valid for.
Note that expires_in is static and does not decrement based on elapsed time: you must add it to created_at to calculate when the token will expire.
DELETE http://localhost:8001/oauth2_tokens/<token ID> allows you to immediately invalidate a token if needed.
Upstream Headers
When a client has been authenticated and authorized, the plugin will append some headers to the request before proxying it to the upstream service, so that you can identify the consumer and the end-user in your code:
-
X-Consumer-ID, the ID of the Consumer on Kong -
X-Consumer-Custom-ID, thecustom_idof the Consumer (if set) -
X-Consumer-Username, theusernameof the Consumer (if set) -
X-Credential-Identifier, theclient_idof the credential (if set), representing the client and the credential associated. See Create an Application for more information. -
X-Authenticated-Scope, the comma-separated list of scopes that the end user has authenticated, if available (only if the consumer is not the ‘anonymous’ consumer) -
X-Authenticated-Userid, the logged-in user ID who has granted permission to the client (only if the consumer is not the ‘anonymous’ consumer) -
X-Anonymous-Consumer, will be set totruewhen authentication failed, and the ‘anonymous’ consumer was set instead.
You can use this information on your side to implement additional logic. You can use the X-Consumer-ID value to query the Kong Admin API and retrieve more information about the Consumer.
OAuth 2.0 Flows
Client Credentials
The Client Credentials flow works out of the box, without building any authorization page.
The clients need to use the /oauth2/token endpoint to request an access token.
You can access the /oauth2/token endpoint to retrieve the access_token in the following ways:
-
Using a POST request, set
Content-Typetoapplication/x-www-form-urlencodedand send the credentials as form data:curl -i -X POST 'https://example.service.com/oauth2/token' \ --header 'Content-Type: application/x-www-form-urlencoded' \ --data-urlencode 'client_id=XXXX' \ --data-urlencode 'client_secret=XXXX' \ --data-urlencode 'grant_type=client_credentials' -
Using a POST request, set
_Content-Typetoapplication/jsonand send the credentials as a JSON body:curl -i -X POST 'https://example.service.com/oauth2/token' \ --header 'Content-Type: application/json' \ --data-raw '{ "client_id": "XXXXX", "client_secret": "XXXX", "grant_type": "client_credentials" }' -
Using a POST request, send the credentials in URL query parameters:
curl -i -X POST 'https://example.service.com/oauth2/token?client_id=XXXX&client_secret=XXXX&grant_type=client_credentials'
Authorization Code
After provisioning Consumers and associating OAuth 2.0 credentials to them, it is important to understand how the OAuth 2.0 authorization flow works. As opposed to most of the Kong plugins, the OAuth 2.0 plugin requires some little additional work on your side to make everything work well:
- You must implement an authorization page on your web application, that will talk with the plugin server-side.
- Optionally you need to explain on your website/documentation how to consume your OAuth 2.0 protected services, so that developers accessing your service know how to build their client implementations
The flow explained
Building the authorization page is going to be the primary task that the plugin itself cannot do out of the box, because it requires to check that the user is properly logged in, and this operation is strongly tied with your authentication implementation.
The authorization page is made of two parts:
- The frontend page that the user will see, and that will allow him to authorize the client application to access his data
- The backend that will process the HTML form displayed in the frontend, that will talk with the OAuth 2.0 plugin on Kong, and that will ultimately redirect the user to a third party URL.
You can see a sample implementation in node.js + express.js on GitHub.
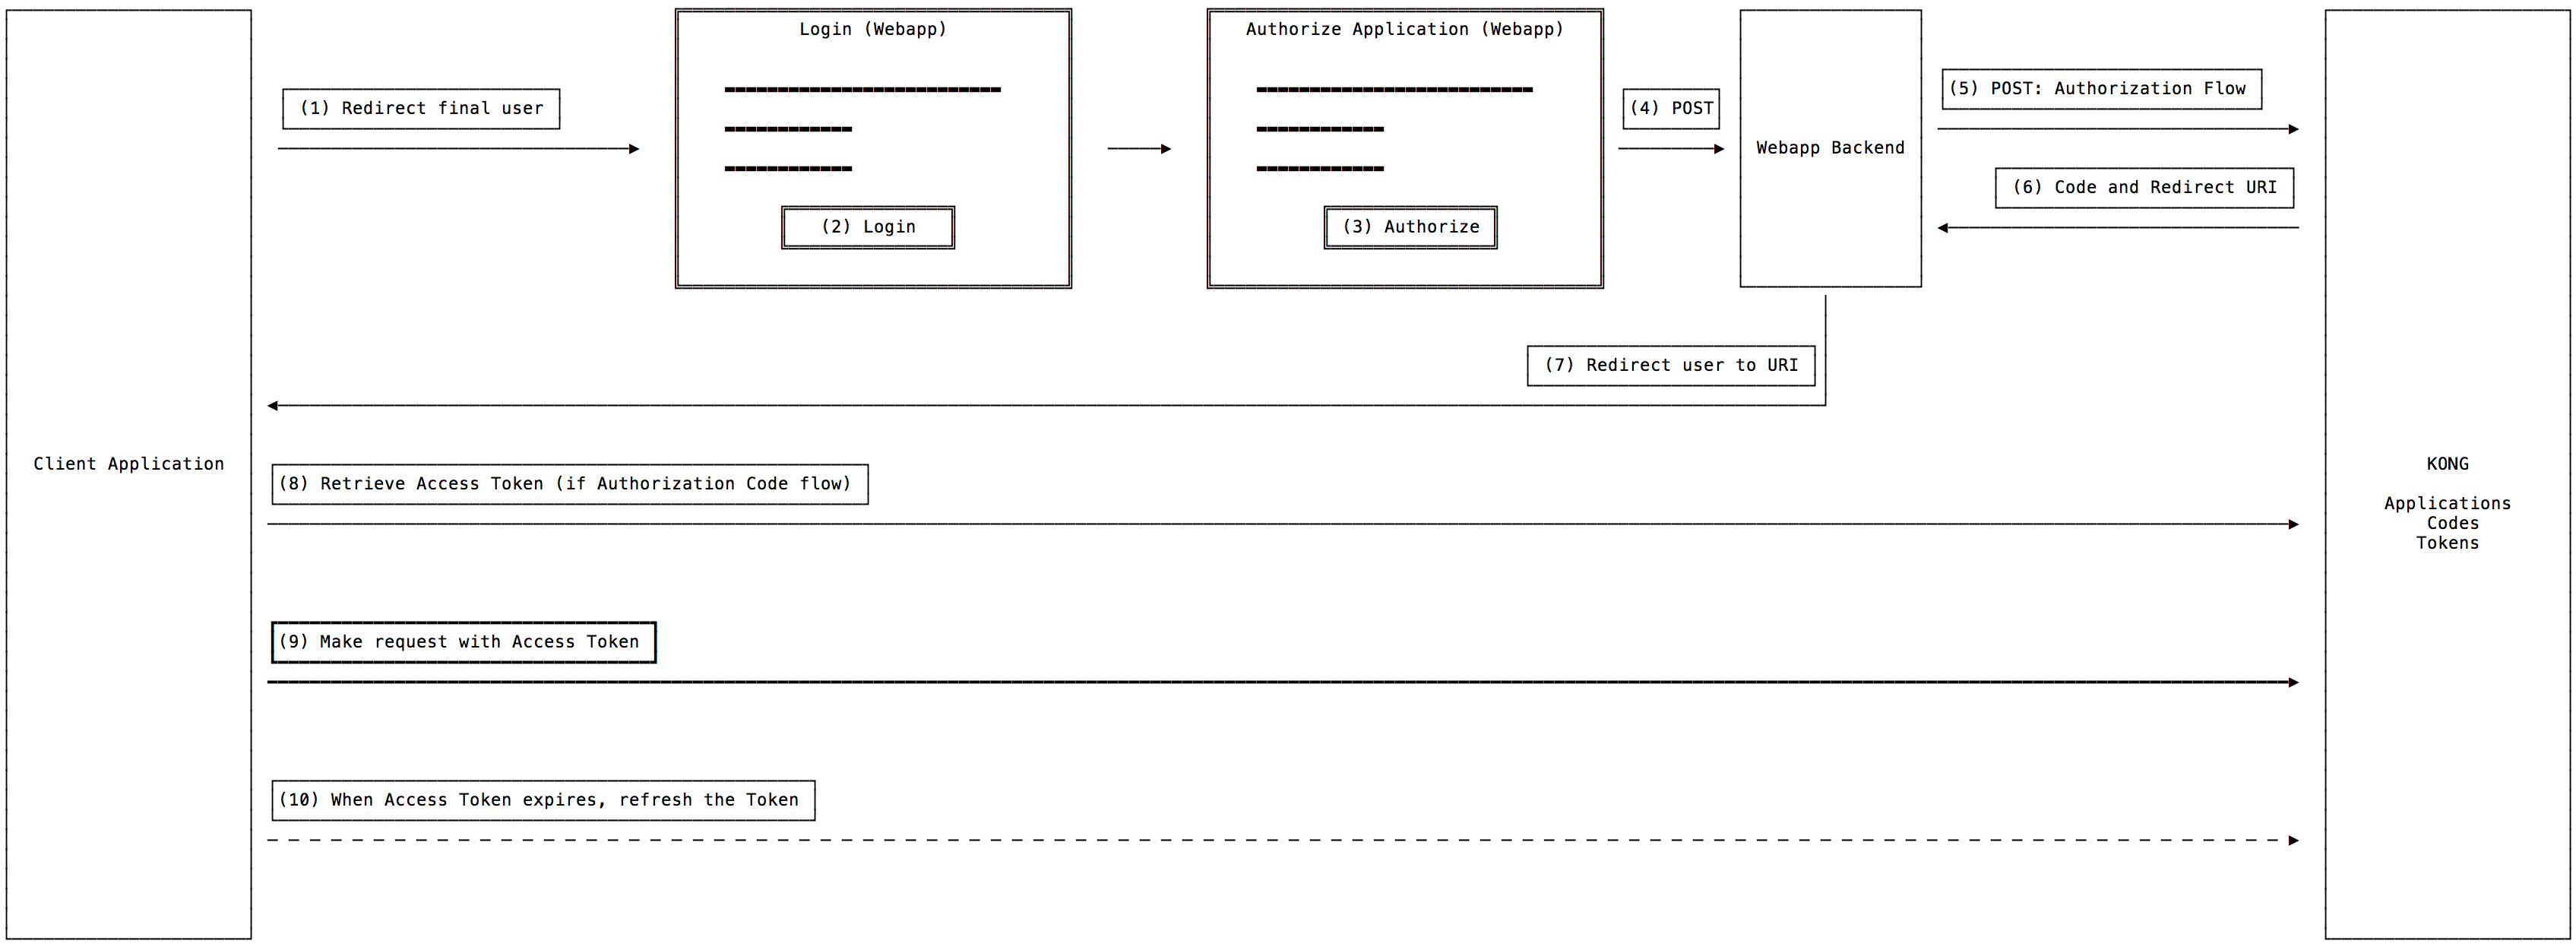
A diagram representing this flow:

-
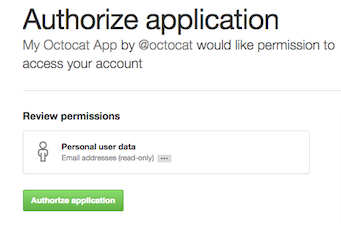
The client application will redirect the end user to the authorization page on your web application, passing
client_id,response_typeandscope(if required) as query string parameters. This is a sample authorization page:
-
Before showing the actual authorization page, the web application will make sure that the user is logged in.
-
The client application will send the
client_idin the query string, from which the web application can retrieve both the OAuth 2.0 application name, and developer name, by making the following request to Kong:curl localhost:8001/oauth2?client_id=XXX -
If the end user authorized the application, the form will submit the data to your backend with a
POSTrequest, sending theclient_id,response_typeandscopeparameters that were placed in<input type="hidden" .. />fields. -
The backend must add the
provision_keyandauthenticated_useridparameters to theclient_id,response_typeandscopeparameters and it will make aPOSTrequest to Kong at your Service address, on the/oauth2/authorizeendpoint. If anAuthorizationheader has been sent by the client, that must be added too. The equivalent of:curl https://your.service.com/oauth2/authorize \ --header "Authorization: Basic czZCaGRSa3F0MzpnWDFmQmF0M2JW" \ --data "client_id=XXX" \ --data "response_type=XXX" \ --data "scope=XXX" \ --data "provision_key=XXX" \ --data "authenticated_userid=XXX"The
provision_keyis the key the plugin has generated when it has been added to the Service whileauthenticated_useridis the ID of the logged-in end user who has granted the permission. -
Kong will respond with a JSON response:
 {
   "redirect_uri": "http://some/url"
 }
With either a
200 OKor400 Bad Requestresponse code depending if the request was successful or not. -
In both cases, ignore the response status code and just redirect the user to whatever URI is being returned in the
redirect_uriproperty. -
The client application will take it from here, and will continue the flow with Kong with no other interaction with your web application. Like exchanging the authorization code for an access token if it’s an Authorization Code Grant flow.
-
Once the Access Token has been retrieved, the client application will make requests on behalf of the user to your upstream service.
-
Access Tokens can expire, and when that happens the client application needs to renew the Access Token with Kong and retrieve a new one.
In this flow, the steps that you need to implement are:
- The login page, you probably already have it (step 2)
- The Authorization page, with its backend that will simply collect the values, make a
POSTrequest to Kong and redirect the user to whatever URL Kong has returned (steps 3 to 7).
(Legacy systems only) Resource owner password credentials
Important: The OAuth2 Security Best Practice explicitly mentions that Resource Owner Password Credentials “MUST NOT BE USED”. The following section is left here as a reference for supporting legacy systems.
The Resource Owner Password Credentials Grant is a much simpler version of the Authorization Code flow, but it still requires to build an authorization backend (without the frontend) in order to make it work properly.

-
On the first request, the client application makes a request with some OAuth2 parameters to your web application.
-
The backend of your web application adds the
provision_keyandgrant_typeparameters to the parameters originally sent by the client, then makes aPOSTrequest to Kong using the/oauth2/tokenendpoint of the configured plugin. If anAuthorizationheader is sent by the client, that must be added too. For example:curl https://your.service.com/oauth2/token \ --header "Authorization: Basic czZCaGRSa3F0MzpnWDFmQmF0M2JW" \ --data "client_id=XXX" \ --data "client_secret=XXX" \ --data "grant_type=password" \ --data "scope=XXX" \ --data "provision_key=XXX" \ --data "authenticated_userid=XXX" \ --data "username=XXX" \ --data "password=XXX"The
provision_keyis the key the plugin has generated when it has been added to the Service, whileauthenticated_useridis the ID of the end user whoseusernameandpasswordbelong to. -
Kong will respond with a JSON response
-
The JSON response sent by Kong must be sent back to the original client as it is. If the operation is successful, this response will include an access token, otherwise it will include an error.
In this flow, the steps that you need to implement are:
- The backend endpoint that will process the original request and will authenticate the
usernameandpasswordvalues sent by the client, and if the authentication is successful, make the request to Kong and return back to the client whatever response Kong has sent back.
Refresh Token
When your access token expires, you can generate a new access token using the refresh token you received in conjunction to your expired access token.
curl -X POST https://your.service.com/oauth2/token \
  --data "grant_type=refresh_token" \
  --data "client_id=XXX" \
  --data "client_secret=XXX" \
  --data "refresh_token=XXX"
gRPC requests
The same access tokens can be used by gRPC applications:
grpcurl -H 'authorization: bearer XXX' ...
Note that the rest of the credentials flow uses HTTPS and not gRPC protocol. Depending on your application, you might have to configure the oauth2 plugin on two separate routes: one under protocols: ["https"] and another under protocols: ["grpcs"].
WebSocket requestsAvailable with Kong Gateway Enterprise subscription - Contact Sales
This plugin cannot issue new tokens from a WebSocket route, because the request will be rejected as an invalid WebSocket handshake. Therefore, to use this plugin with WebSocket services, an additional non-WebSocket route must be used to issue tokens.
- Create a WebSocket service:
curl -X POST http://localhost:8001/services/ \ --data "name=my-websocket-service" \ --data "url=ws://my-websocket-backend:8080/" - Attach a route to the service:
curl -X POST http://localhost:8001/services/my-websocket-service/routes \ --data "name=my-websocket-route" \ --data "protocols=wss" \ --data "hosts=my-websocket-hostname.com" \ -
Attach an OAuth2 plugin instance to the service:
Note: Setting
global_credentials=trueis necessary to allow tokens created by other plugin instances.curl -x POST http://localhost:8001/services/my-websocket-service/plugins \ --data "name=oauth2" \ --data "config.scopes=email" \ --data "config.scopes=profile" \ --data "config.global_credentials=true" - Create another route to handle token creation:
Note: Adding a POST method matcher ensures that regular WebSocket handshake requests will not match this route.
curl -X POST http://localhost:8001/routes \ --data "name=my-websocket-token-helper" \ --data "protocols=https" \ --data "hosts=my-websocket-hostname.com" \ --data "methods=POST" -
Finally, add the additional OAuth2 plugin instance, using the route:
 curl -x POST http://localhost:8001/routes/my-websocket-token-helper/plugins \
   --data "name=oauth2" \
   --data "config.scopes=email" \
   --data "config.scopes=profile" \
   --data "config.global_credentials=true"
Client token requests (for example: POST https://my-websocket-hostname.com/oauth2/authorize)
will be handled by the oauth2 plugin instance attached to the my-websocket-token-helper
route, and tokens issued by this route can be used in the WebSocket handshake
request to the my-websocket-route route.


