


Kong Gateway
API gateway built for hybrid and multi-cloud, optimized for microservices and distributed architectures
Set up your Gateway in under 5 minutes with Kong Konnect:
Kong Konnect is an API lifecycle management platform that lets you build modern applications better, faster, and more securely.
How to get started
To learn more about what you can do with Kong Gateway, see Features.
Introducing Kong Gateway
Kong Gateway is a lightweight, fast, and flexible cloud-native API gateway. An API gateway is a reverse proxy that lets you manage, configure, and route requests to your APIs.
Kong Gateway runs in front of any RESTful API and can be extended through modules and plugins. It’s designed to run on decentralized architectures, including hybrid-cloud and multi-cloud deployments.
With Kong Gateway, users can:
- Leverage workflow automation and modern GitOps practices
- Decentralize applications/services and transition to microservices
- Create a thriving API developer ecosystem
- Proactively identify API-related anomalies and threats
- Secure and govern APIs/services, and improve API visibility across the entire organization.
Looking for additional help? Free training and curated content, just for you:
Extending the Kong Gateway
Kong Gateway is a Lua application running in Nginx. Kong Gateway is distributed along with OpenResty, which is a bundle of modules that extend the lua-nginx-module.
This sets the foundations for a modular architecture, where plugins can be enabled and executed at runtime. At its core, Kong Gateway implements database abstraction, routing, and plugin management. Plugins can live in separate code bases and be injected anywhere into the request lifecycle, all with a few lines of code.
Kong provides many plugins for you to use in your Gateway deployments. You can also create your own custom plugins. For more information, see the plugin development guide, the PDK reference, and the guide on creating plugins with other languages (JavaScript, Go, and Python).
Packages and modes
There are two ways to deploy Kong Gateway: Managed with Kong Konnect, and self-managed. If you’re trying out Kong Gateway for the first time, we recommend starting with Kong Konnect.
Konnect
Konnect provides the easiest way to get started with Kong Gateway. The global control plane is hosted in the cloud by Kong, and you manage the individual data plane nodes within your preferred network environment.
Konnect offers two pricing packages:
-
Plus: Our self-serve pay-as-you-go pricing model, giving you access to the Konnect platform in its entirety while offering the flexibility to only pay for the services your organization uses.
-
Enterprise: With an Enterprise subscription, you have access to the entire Kong Konnect suite and:
- 24x7x365 technical support
- Professional Services to create a purpose-built solution for your environment
For more information, visit the pricing page.
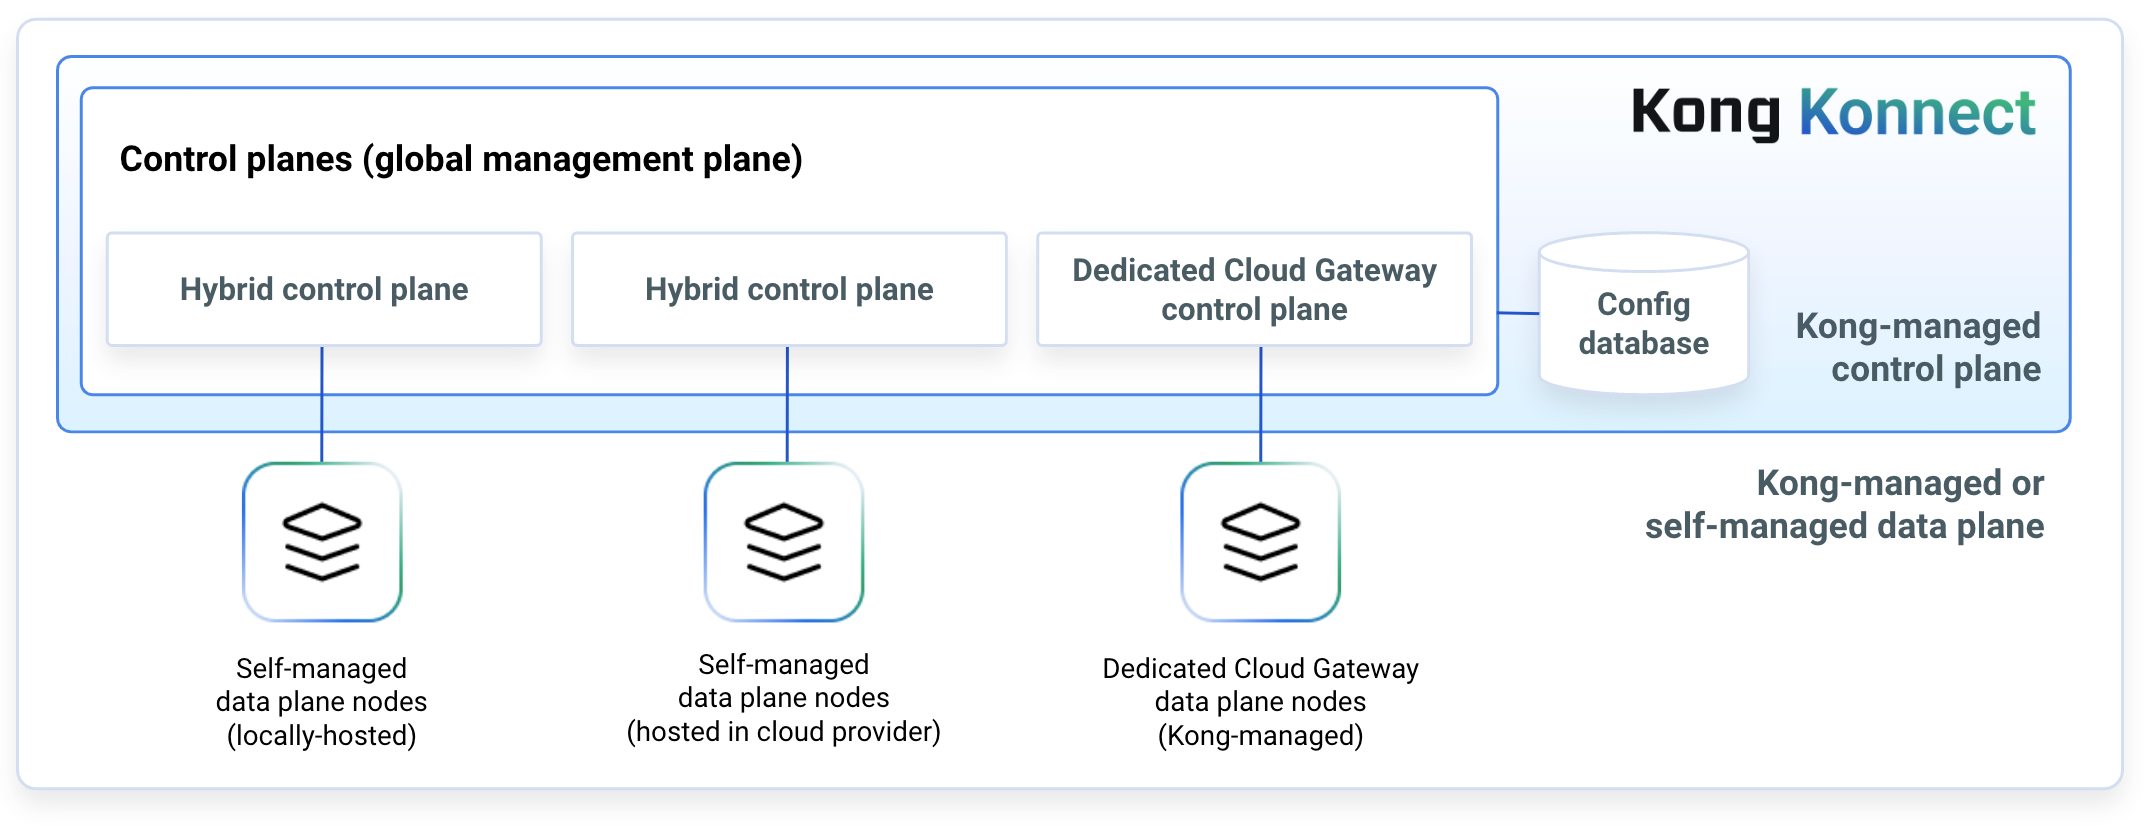
Figure 1: Diagram of Kong Gateway data planes connected to a Konnect control plane.
Requests flow from an API client into the Gateway data planes, are modified and managed by the proxy based on your control plane configuration, and are forwarded to upstream services.
Self-managed
Kong Gateway is available in two different packages: Open Source (OSS) and Enterprise.
Kong Gateway (OSS): An open-source package containing the basic API gateway functionality and open-source plugins. You can manage the open-source Gateway with Kong’s Admin API, Kong Manager Open Source, or with declarative configuration.
Kong Gateway Enterprise (available in Free or Enterprise mode): Kong’s API gateway with added functionality.
- In Free mode, this package adds Kong Manager to the basic open-source functionality.
- With an Enterprise subscription, it also includes:
You can manage Kong Gateway Enterprise in Free or Enterprise mode with Kong’s Admin API, declarative configuration, or Kong Manager.
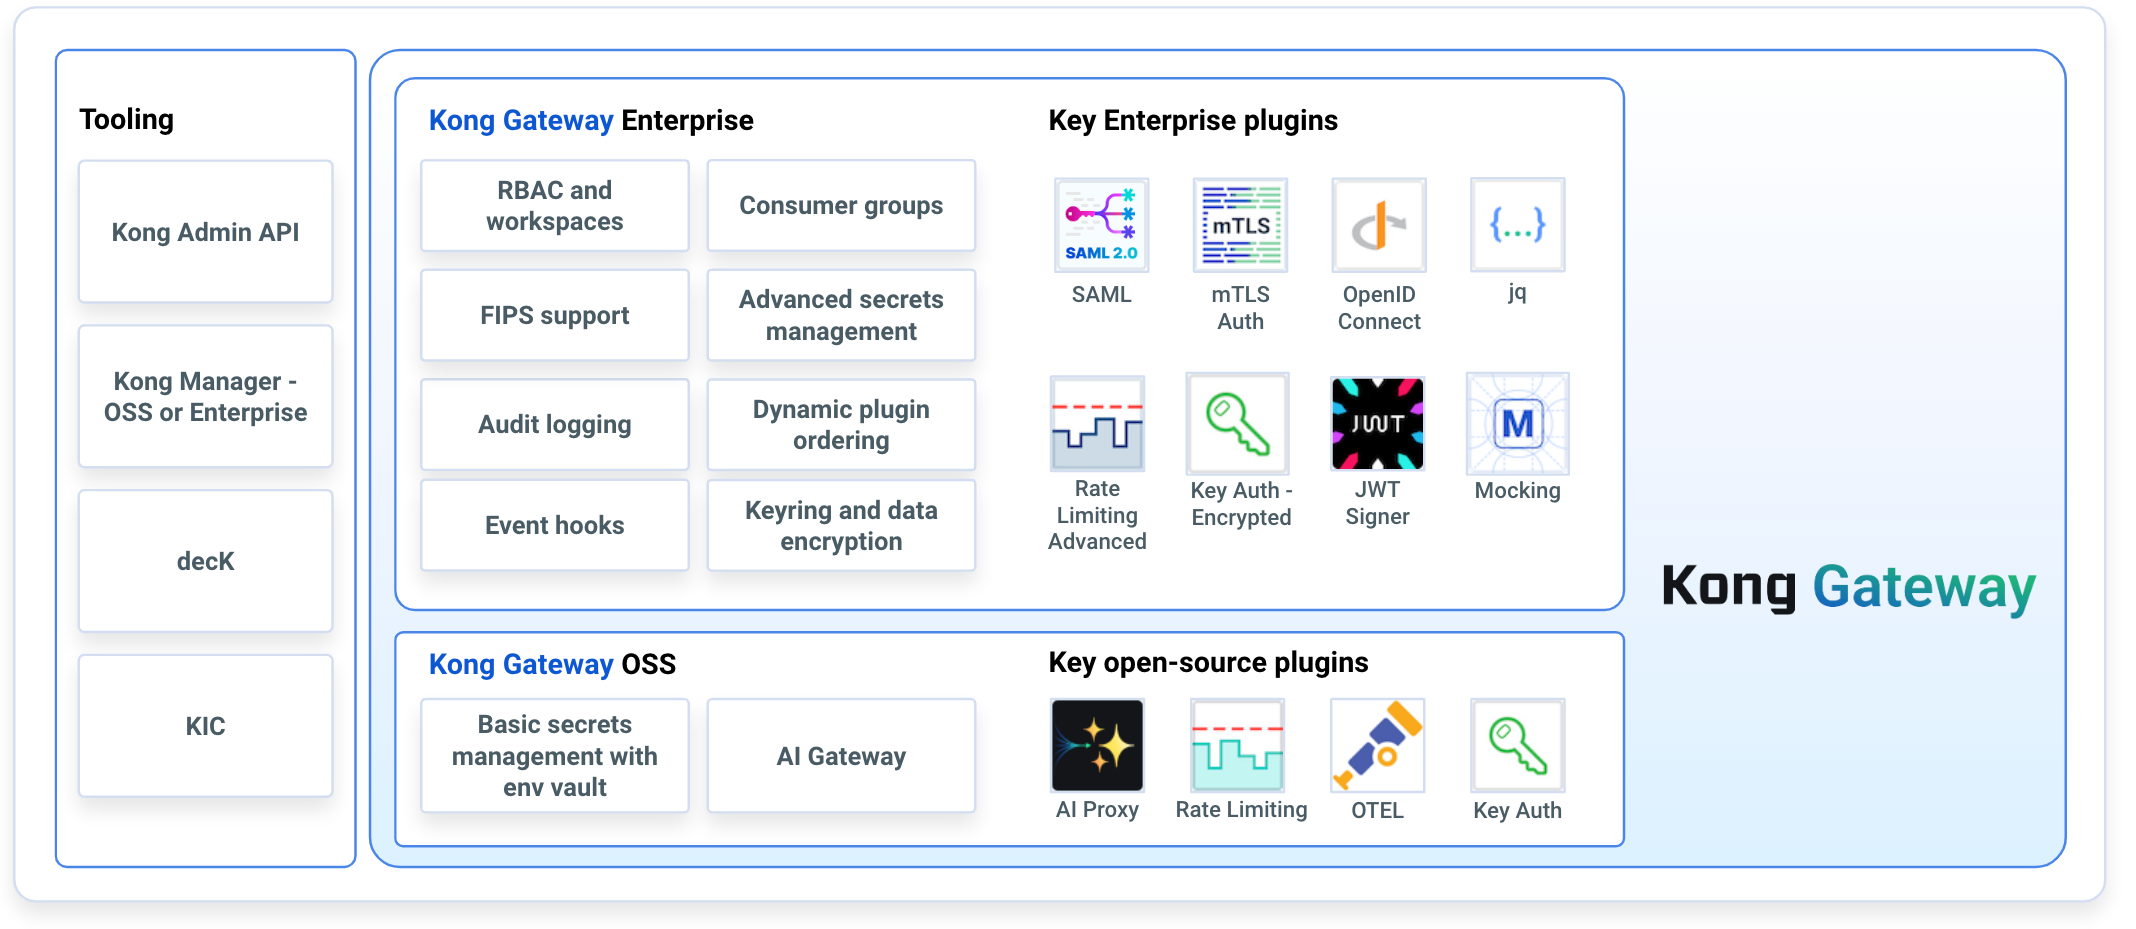
Figure 2: Diagram of Kong Gateway key features. Kong Gateway (OSS) provides basic functionality, while Kong Gateway Enterprise builds on top of the open-source foundation with advanced proxy features.
Requests flow from an API client into the Gateway, are modified and managed by the proxy based on your Gateway configuration, and forwarded to upstream services.
Features
| Open Source Open Source Get Started | Kong Gateway Enterprise Kong Gateway Enterprise Contact Sales | |
|---|---|---|
| API Infrastructure Modernization | ||
| Fast, Lightweight, Cloud-Native API Gateway | ||
|
End-to-End Automation
Drive a GitOps flow of API design and execution
|
||
|
Kong Ingress Controller
Deploy APIs to Kubernetes in a native fashion
|
||
|
Gateway Mocking
Mock API responses directly on the API gateway
|
||
|
Kong Manager: Admin GUI
Visually manage Kong cluster, plugins, APIs, and consumers
|
||
| Traffic Management and Transformations | ||
|
Basic Traffic Control Plugins
Manage ACME certificates, basic rate limiting, and lightweight caching
|
||
|
Simple Data Transformations
Add or remove headers, JSON data, or query strings
|
||
|
gRPC Transformations
Translate requests from gRPC-Web and REST to backend gRPC services
|
||
|
GraphQL
Convert GraphQL queries to REST requests. Rate limit and cache GraphQL queries.
|
||
|
Request Validation
Validate requests using either Kong’s own schema validator or a JSON Schema Draft 4-compliant validator
|
||
|
jq Transformations
Advanced JSON transformations of requests or responses with the ability to chain transformations
|
||
|
Advanced Caching
Cache responses and optimize for high scale by integrating distributed backends
|
||
|
Advanced Rate Limiting
Enterprise-grade rate limiting with sliding window controls
|
||
| Security and Governance | ||
|
Authentication
Common methods of API authentication - Basic Auth, HMAC, JWT Key Auth, limited OAuth 2.0, limited LDAP
|
||
|
Advanced Authentication
Enterprise-grade API authentication - Full OAuth 2.0, OpenID Connect, Vault, mutual TLS, JWT signing/resigning, full LDAP
|
||
|
Role-Based Access Control (RBAC)
Control gateway configurations based on a user's role in the organization
|
||
|
Basic Authorization (Bot Detection, CORS controls, ACLs)
Control access to APIs by rules of user behavior and control lists
|
||
|
Advanced Authorization (OPA)
Control access to APIs with complex, programmable, enterprise-wide rules
|
||
|
Secret Management
Encrypt sensitive keys, certificates, and passwords
|
||
|
FIPS 140-2 Support
Kong Gateway now provides a FIPS mode, which at its core uses the FIPS 140-2 compliant BoringCrypto for cryptographic operations.
|
||
|
Signed Kong Images
Kong Gateway container images are signed and verifiable in accordance with SLSA guidelines.
|
||
|
Kong Images Build Provenance
Kong Gateway container images generate build level provenance and are verifiable in accordance with SLSA guidelines.
|
||
| AI Gateway | ||
|
Multi-LLM support
Switch between different AI providers and models without having to change your application code
|
||
|
AI traffic control
Proxy AI traffic through the Kong Gateway and manage it with AI plugins
|
||
|
AI prompt security
Enforce secure and compliant AI prompts with the AI Prompt Decorator, AI Prompt Guard, and AI Prompt Template plugins
|
||
|
AI observability
Collect metrics from AI traffic, and use any Kong Gateway logging plugin to send it to your logging provider of choice
|
||
| Enterprise Support and Services | ||
|
Enterprise support
24/7 x 365 technical support SLAs
|
||
| Security CVE and Bug Fix Backports | ||
| Performance Tuning Guidance | ||
|
Customer Success Packages - Add-on
Accelerate time to value with dedicated Technical Account Managers and Field Engineers
|
Kong Admin API
Kong Admin API provides a RESTful interface for administration and configuration of Gateway entities such as services, routes, plugins, consumers, and more. All of the tasks you can perform against the Gateway can be automated using the Kong Admin API.
Kong Manager
Note: If you are running Kong in traditional mode, increased traffic could lead to potential performance with Kong Proxy. Server-side sorting and filtering large quantities of entities will also cause increased CPU usage in both Kong CP and database.
Kong Manager is the graphical user interface (GUI) for Kong Gateway. It uses the Kong Admin API under the hood to administer and control Kong Gateway.
Here are some of the things you can do with Kong Manager:
- Create new routes and services
- Activate or deactivate plugins with a couple of clicks
- Group your teams, services, plugins, consumer management, and everything else exactly how you want them
Kubernetes
Kong Gateway can run natively on Kubernetes with its custom ingress controller, Helm chart, and Operator. A Kubernetes ingress controller is a proxy that exposes Kubernetes services from applications (for example, Deployments, ReplicaSets) running on a Kubernetes cluster to client applications running outside of the cluster. The intent of an ingress controller is to provide a single point of control for all incoming traffic into the Kubernetes cluster.
Kong Gateway plugins
Kong Gateway plugins provide advanced functionality to better manage your API and microservices. With turnkey capabilities to meet the most challenging use cases, Kong Gateway plugins ensure maximum control and minimizes unnecessary overhead. Enable features like authentication, rate-limiting, and transformations by enabling Kong Gateway plugins through Kong Manager or the Admin API.
Tools
Kong also provides API lifecycle management tools that you can use with Kong Gateway.
Insomnia
Insomnia enables spec-first development for all REST and GraphQL services. With Insomnia, organizations can accelerate design and test workflows using automated testing, direct Git sync, and inspection of all response types. Teams of all sizes can use Insomnia to increase development velocity, reduce deployment risk, and increase collaboration.
decK
decK helps manage Kong Gateway’s configuration in a declarative fashion. This means that a developer can define the desired state of Kong Gateway or Konnect – services, routes, plugins, and more – and let decK handle implementation without needing to execute each step manually, as you would with the Kong Admin API.
Get started with Kong Gateway
Download and install Kong Gateway. To test it out, you can choose either the open-source package, or run Kong Gateway Enterprise in free mode and also try out Kong Manager.
After installation, get started with the introductory quickstart guide.
Try in Konnect
Kong Konnect can manage Kong Gateway instances. With this setup, Kong hosts the control plane and you host your own data planes.
There are a few ways to test out the Gateway’s Enterprise features:
- Sign up for Kong Konnect.
- Check out learning labs at Kong Academy.
- If you are interested in evaluating Enterprise features locally, request a demo and a Kong representative will reach out with details to get you started.
Support policy
Kong follows a structured approach to versioning its products.
For the latest version support information for Kong Gateway Enterprise and Kong Mesh, see the version support policy.